
how to install bike rack on car usually comes down to three things: matching the rack to your vehicle, tightening it in the right order, and doing a quick safety check before you roll out.
If you’ve ever heard a rack creak on the freeway or watched bikes sway in the mirror, you already know why this matters, one loose hook or under-tightened knob can turn an easy ride into a stressful drive.
This guide walks you through the most common rack styles in the U.S. (hitch, trunk, roof), what to check before you buy or install, and the little “don’t skip this” steps that keep paint, bikes, and other drivers safer.
Quick note: your rack’s manual still wins if there’s any conflict, and if you’re unsure about tow ratings, roof load limits, or a carbon frame clamp point, it’s worth asking a shop.
Pick the right rack style for your car (and your bikes)
Before you install anything, confirm you’re not fighting the wrong setup. Most installation problems come from a mismatch: wrong hitch size, trunk straps on a spoiler, a roof rack that can’t clear a garage, or a frame clamp that doesn’t play well with your bike.
Common rack types and when they make sense
| Rack type | Best for | Watch-outs |
|---|---|---|
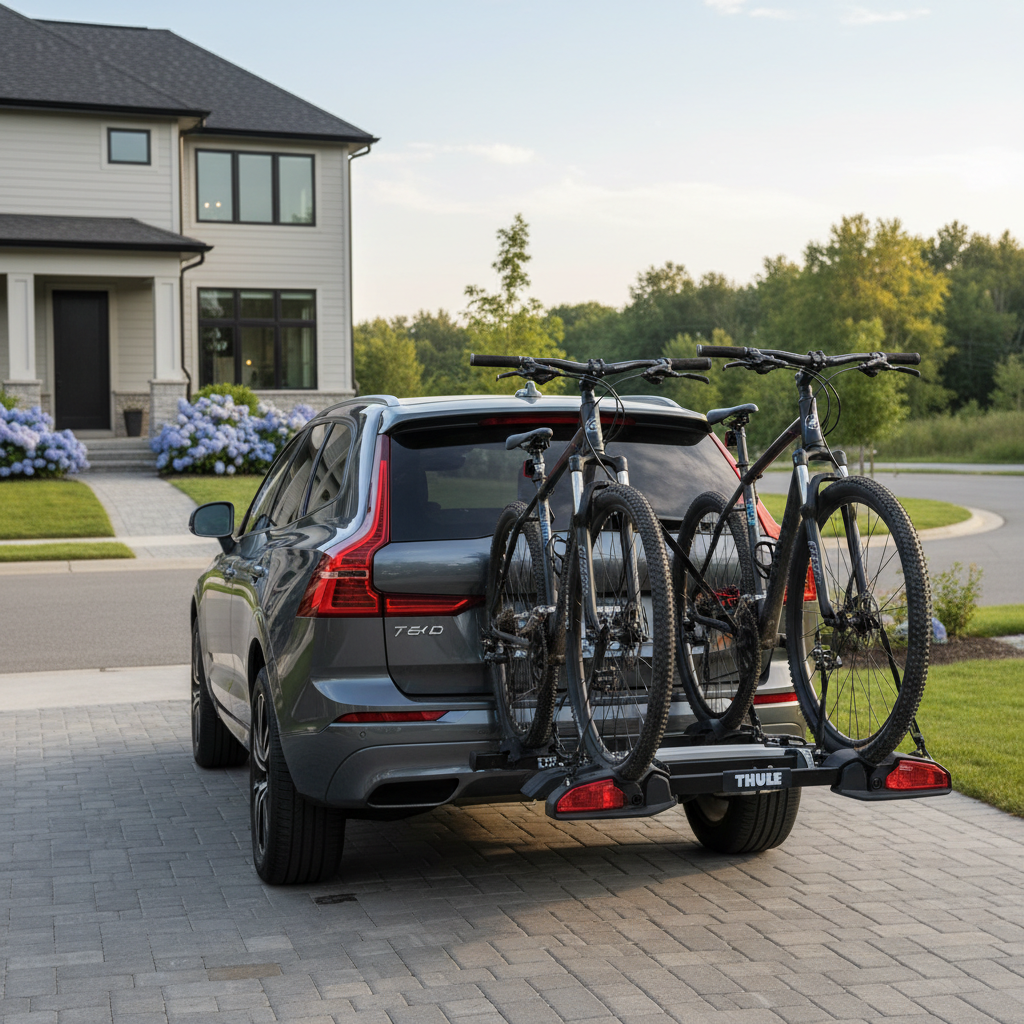
| Hitch rack | Frequent driving, heavier bikes, easiest loading | Correct hitch class/receiver size, rack wobble if not tightened, tailgate clearance |
| Trunk (strap) rack | Occasional use, cars without a hitch | Paint protection, strap routing, not ideal for many spoilers or some hatchbacks |
| Roof rack + bike tray | Keeping rear access clear, multiple bikes with the right crossbars | Overall height, lifting effort, crossbar fit and torque |
- Heavy e-bikes: many riders end up with hitch racks because lifting to a roof and managing weight on straps can get sketchy fast.
- Carbon frames: a wheel-hold “tray” style often reduces clamp pressure on tubes, but check your bike brand’s guidance.
- Urban parking: roof setups reduce rear overhang, but you must remember your new height every single time.
What to check before installing (the 5-minute sanity test)
Do this once and you’ll avoid most of the “why doesn’t this feel solid?” frustration.
- Vehicle compatibility: verify your rack is approved for your car body style, especially for trunk racks on hatchbacks, spoilers, or glass-heavy liftgates.
- Weight capacity: confirm rack rating per bike and total, and keep in mind accessories like batteries and racks add up.
- Contact points: identify where the rack touches paint, trim, or glass, then clean those surfaces so grit doesn’t grind into the finish.
- Hardware condition: check straps for fraying, buckles for cracks, hitch pins/locks for smooth engagement, and any anti-rattle parts for wear.
- Lights and plate visibility: your bikes can block them; local rules vary, so plan for a relocation bracket or auxiliary lights if needed.
According to NHTSA, secure loads and clear visibility are core safety basics for road travel, and while bike racks aren’t their only focus, the principle holds: if your setup blocks lights or shifts, fix it before driving.
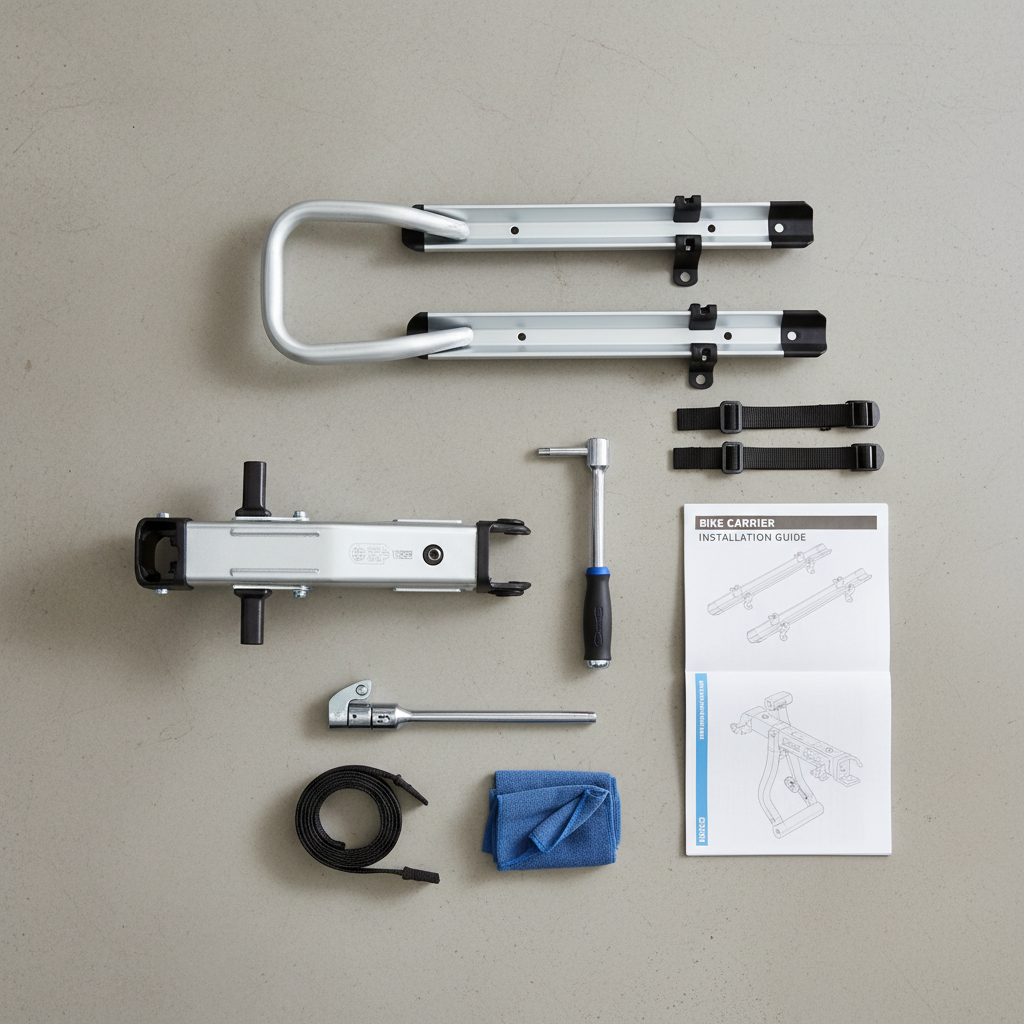
How to install a hitch bike rack (most common in the U.S.)
If your goal is a stable setup, this is often the easiest path. The trick is tightening in sequence: insert, pin, remove play, then load.
Step-by-step
- Confirm receiver size: most are 1.25-inch or 2-inch. Don’t “make it work” with loose adapters unless the rack manufacturer allows it.
- Clear the receiver: remove the hitch cover, wipe out dirt, and check for heavy rust or deformation that prevents full insertion.
- Insert the rack fully: slide the rack shank in until the pin holes line up.
- Install the hitch pin or locking pin: push through completely, then clip or lock it. If it doesn’t go in smoothly, don’t force it, realign the holes.
- Engage the anti-wobble mechanism: many racks use a threaded hitch pin, wedge, or cam. Tighten until side-to-side play reduces, but avoid over-torquing.
- Set the rack angle and tilt lock: make sure the rack’s tilt/fold feature fully clicks into its detent position.
- Shake test: grab the rack and rock it. Some movement is normal, clunking or “slop” usually means the anti-rattle isn’t seated.
Loading bikes (stable order matters)
- Load the heaviest bike closest to the car to reduce leverage and sway.
- Secure wheel straps first, then the frame or hook arm, then re-check wheel straps for slack.
- Remove or lower anything that can rattle loose: pumps, bags, bottles, and for some e-bikes, consider removing the battery if the manufacturer recommends it.
Key point: if you can spin a wheel strap buckle by hand after tightening, it’s usually not tight enough for highway speeds.
How to install a trunk (strap) bike rack without wrecking your paint
Trunk racks are convenient, but they punish sloppy setup. Most issues come from strap placement and dirty contact points.
Step-by-step
- Clean the contact areas: wash and dry the trunk or hatch where pads will sit, even small grit can scuff.
- Pre-adjust the arms: set the rack’s upper and lower legs to match your trunk angle, so it sits flat instead of teetering.
- Hook placement: place upper hooks on a solid metal edge when possible, avoid fragile trim, weather stripping, or unsupported plastic.
- Tighten in a balanced pattern: snug upper straps, then lower, then side stabilizers, and repeat until the rack stops shifting.
- Protect vulnerable edges: if your rack includes clear film or pads, use them; if not, many people add a paint-safe protective layer made for this purpose.
- Final alignment: the rack should sit centered, pads evenly loaded, with straps not twisted and buckles not rubbing paint.
Two trunk-rack checks people skip
- Trunk/hatch function: opening a hatch with bikes mounted can overstress straps or hinges, many manufacturers advise against it.
- Exhaust heat: on some cars, the closest bike tire can sit near a hot exhaust stream, reposition bikes if you notice heat exposure.
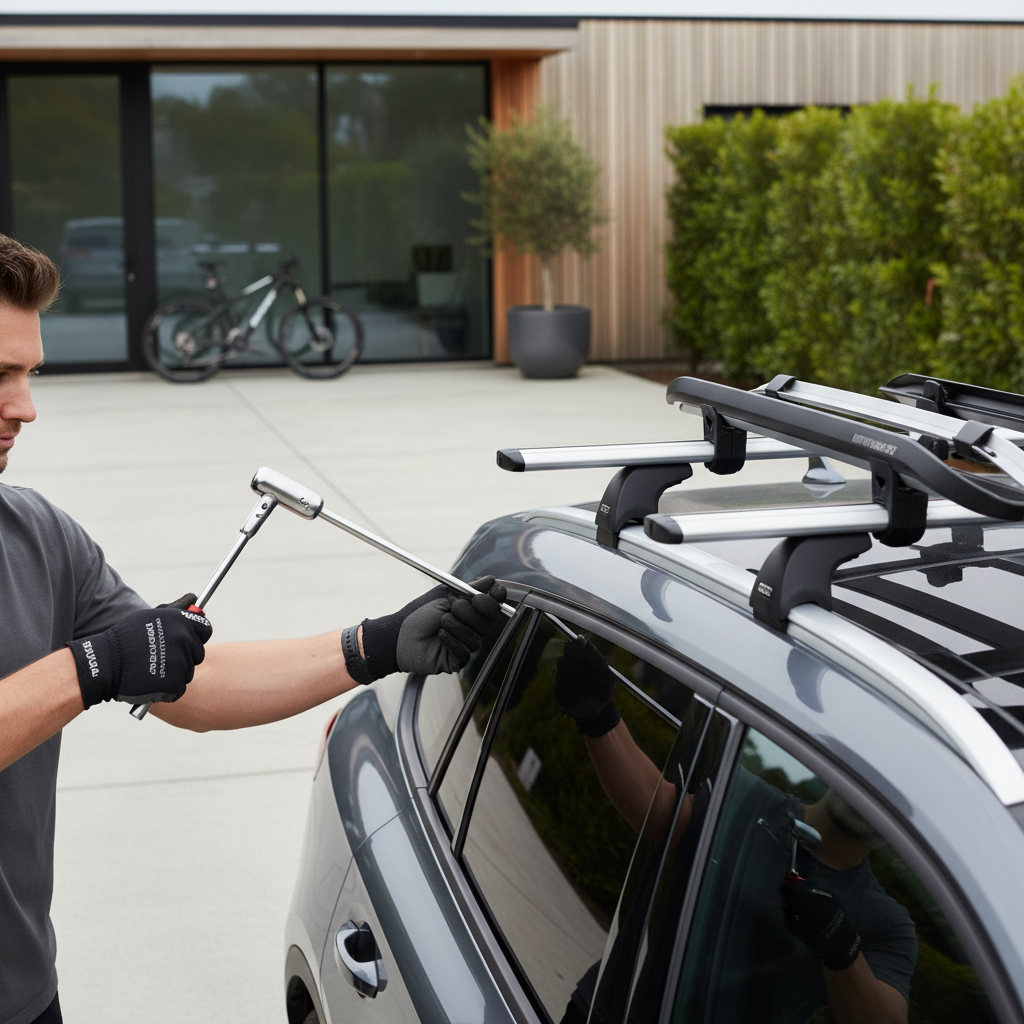
How to install a roof rack bike carrier (and not forget your new height)
Roof setups can be very secure when crossbars and trays match correctly, but they’re less forgiving if you rush the torque or ignore height limits.
Step-by-step
- Verify crossbar system: factory side rails need compatible crossbars, and clamp-style feet must match your roof profile.
- Position crossbars: set bar spacing within the tray manufacturer’s range, then center left-to-right.
- Mount the bike tray: clamp or T-slot mount per the instructions, tighten evenly so the tray stays straight.
- Torque carefully: if your system specifies torque values, use a torque tool, “hand tight” varies wildly.
- Load the bike and secure: front wheel clamp or fork mount locked, rear wheel strap snug, then shake the bike at the bars.
Height reality check
Put a small reminder on your dashboard with your approximate total height if you park in garages or drive-throughs, it sounds obvious, but this is the mistake that costs the most.
Pre-drive safety checklist (do this every time)
how to install bike rack on car is only half the job, the other half is confirming nothing has loosened after loading.
- Rack attachment: hitch pin locked, straps tight, roof clamps secure.
- Bike retention: no loose wheel straps, frame hooks seated, no pedal or handlebar hitting the car.
- Movement test: a little flex is normal, sharp clunks are not.
- Visibility: brake lights, turn signals, and license plate as clear as practical.
- After 10–15 minutes: re-check tightness at your first stop, straps and knobs can settle.
According to AAA, securing cargo and avoiding road hazards includes checking loads during a trip, the quick re-tighten stop is a boring habit that prevents messy outcomes.
Mistakes that cause wobble, noise, or damage
- Overtightening to “fix” looseness: if a hitch rack still wiggles, you may need a proper anti-rattle device or correct receiver fit, not brute force.
- Twisted straps on trunk racks: twists reduce strap strength and can loosen under vibration.
- Clamping the wrong bike tube: especially on carbon or thin-walled frames, pressure points matter, check your bike maker guidance.
- Ignoring swing clearance: bars and pedals can tap the hatch or bumper on bumps, add spacing or adjust bike order.
- Skipping basic cleaning: dust under pads behaves like sandpaper on paint.
If you’re troubleshooting, focus on where the play starts: receiver-to-rack, rack-to-car contact points, or bike-to-rack straps, guessing wastes time.
When it’s worth asking a professional
Most people can handle installation at home, but a shop or hitch installer can save headaches when the fit is borderline.
- You’re adding a hitch and aren’t sure about vehicle tow ratings or wiring requirements.
- Your car has a fragile hatch design, hidden sensors, or trim that a trunk rack might stress.
- You carry heavy bikes and notice persistent sway even after correct tightening.
- You need a solution for blocked lights or plate, and want it done in a way that stays legal where you drive.
According to SAE International, vehicle load and attachment considerations can affect stability and safety, so when you’re near limits, getting a qualified opinion is a practical move, not overkill.
Conclusion: a solid install is mostly routine checks
how to install bike rack on car isn’t complicated, but it rewards patience: confirm compatibility, tighten in the right order, load the heaviest bike closest to the car, then do a short re-check stop early in your drive.
If you want one action that pays off immediately, keep a small “rack kit” in the trunk: a microfiber cloth, a basic wrench or hex key that matches your rack, and a reminder card for your pre-drive checklist.